If you are learning Python, one of the best habits you can build early is using a virtual environment for every project. At first, the term “virtual environment” may sound technical or intimidating, but the idea behind it is actually very simple.
A virtual environment gives each Python project its own isolated space for packages and dependencies. This prevents one project from interfering with another and helps you avoid many common problems beginners face when installing libraries.
According to Python Software Foundation documentation, virtual environments are a standard part of modern Python development. The Python Packaging Authority (PyPA) also recommends using them for clean, predictable project setups.
In this guide, you will learn:
- What a virtual environment is
- Why beginners should use one
- How to create and activate a virtual environment on Windows
- How to install packages safely
- Common mistakes to avoid
- How virtual environments work with VS Code
No advanced knowledge is required. If Python is already installed, you’re ready to begin.
What Is a Virtual Environment in Python?
A virtual environment is a self-contained directory that includes:
- A Python interpreter
- Its own
piptool - A private folder for installed packages
This environment is separate from your system Python installation. Any packages you install inside it are only available to that specific project.
Why does this matter?
Without virtual environments, Python installs packages globally. This can quickly lead to problems when:
- Two projects require different versions of the same library
- Updating one package breaks another project
- You forget which packages belong to which project
A virtual environment solves this by keeping everything isolated. Each project gets exactly what it needs—nothing more, nothing less.
This isolation is the reason virtual environments are considered best practice, even for beginners.
Why Beginners Should Use Virtual Environments
Many beginners skip virtual environments at first. The problems usually appear later.
Here’s what often happens without one:
- You install a package globally
- A different project stops working
- You don’t remember what changed
- Debugging becomes frustrating
Using a virtual environment from the start helps you avoid:
- Dependency conflicts
- Broken projects
- Hard-to-trace errors
- Messy system Python installations
It also teaches you real-world Python workflow habits early, making it much easier to work on larger projects later.
Even for simple learning scripts, virtual environments are worth using.
Before You Start
Before creating a virtual environment, make sure:
- Python is installed on your system
- You can open a terminal
- You know where your project folder is located
Modern Python versions include the built-in venv module, so you do not need to install anything extra.
You can use:
- Command Prompt
- PowerShell
- Windows Terminal
- The integrated terminal in Visual Studio Code
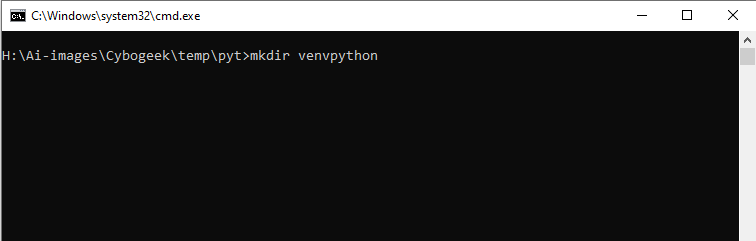
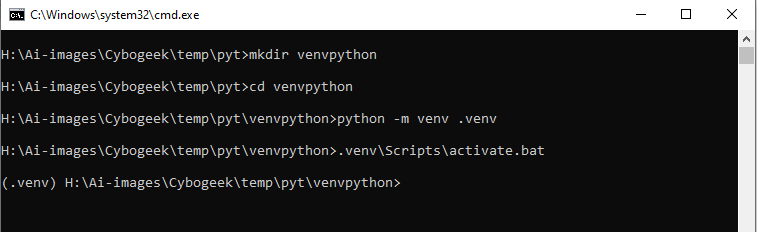
Step 1: Open or Create Your Project Folder
First, create or open the folder where your Python project will live.
Example:
mkdir myproject
cd myproject
Now open a terminal inside this folder. This is important because the virtual environment should live inside the project, not somewhere else on your system.
Why name the folder .venv?
A commonly recommended name for virtual environments is .venv.
Python’s own tutorial mentions .venv as a popular choice because:
- It stays out of the way
- It avoids confusion with
.envfiles - Many tools automatically detect it
Using .venv is a clean, modern default.
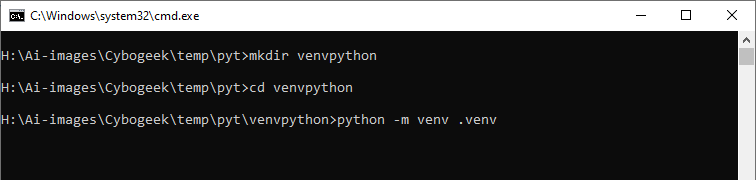
Step 2: Create the Virtual Environment
Run the following command inside your project folder:
python -m venv .venvThis command tells Python:
- Use the built-in
venvmodule - Create a virtual environment
- Store it in a folder named
.venv
The Python Packaging Authority uses this exact pattern in its examples, making it a widely accepted standard.
Alternative command on Windows
If your system uses the Python launcher, this also works:
py -m venv .venvPython’s documentation explains that the virtual environment is created using the Python version that runs the command. That’s why python -m venv (or py -m venv) matters.
Step 3: Activate the Virtual Environment
Creating the environment is not enough—you must activate it.
Activation tells your terminal:
“Use the Python inside this project, not the system Python.”
Activation commands on Windows
Command Prompt:
.venv\Scripts\activate.bat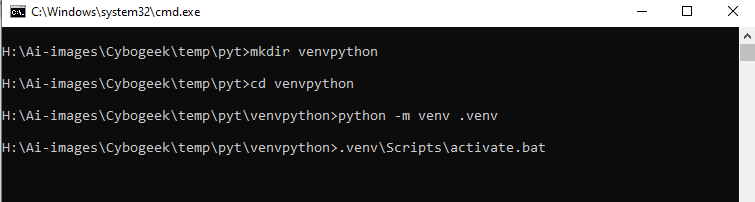
PowerShell:
.venv\Scripts\Activate.ps1On Windows, activation scripts live inside the Scripts folder of the environment.
How do you know it worked?
Once activated, your terminal prompt usually changes to show:
(.venv)This means the virtual environment is active.
Step 4: Verify the Virtual Environment Is Working
Now confirm that your terminal is using the correct Python.
Run:
python --version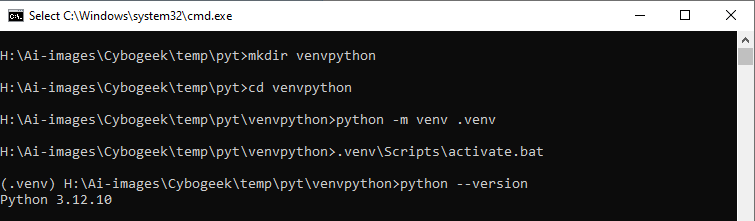
Then check the Python path:
where pythonWhile the environment is active, the path should point to something like:
...\myproject\.venv\Scripts\python.exeThe packaging guide explains that this confirms Python is being loaded from the virtual environment, not the global installation.
Step 5: Install Packages Safely Inside the Environment
Once the environment is active, any package you install with pip goes only into that environment.
Example:
pip install requestsNow the requests library is available to this project only.
This is the main benefit of virtual environments:
- No global pollution
- No accidental conflicts
- Cleaner project dependencies
If you deactivate the environment and open another project, that package will not appear there.
Step 6: Deactivate the Virtual Environment
When you are done working, you can exit the environment by typing:
deactivateThis returns your terminal to the normal system Python.
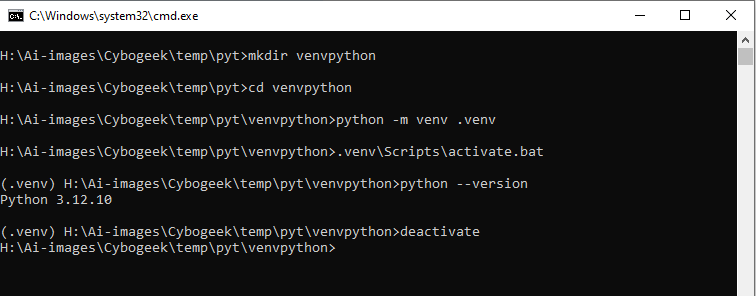
The standard workflow is:
- Create the environment
- Activate it
- Work on the project
- Deactivate when finished
This cycle becomes second nature very quickly.
Using Virtual Environments in VS Code
If you use Visual Studio Code, virtual environments integrate smoothly.
Steps:
- Open the project folder in VS Code
- Open the command palette
- Select Python: Select Interpreter
- Choose the interpreter inside
.venv
According to guides from Real Python, VS Code can automatically detect environments and display paths like:
.venv\Scripts\pythonOnce selected:
- VS Code uses the correct packages
- Linting works properly
- Debugging becomes more reliable
Common Mistakes Beginners Make
Most virtual environment issues come from a few simple mistakes:
- Creating the environment outside the project folder
- Forgetting to activate the environment before installing packages
- Using the wrong activation command
- Installing packages globally by accident
- Deleting
.venvwithout understanding what it does - Committing
.venvto Git
The Python Packaging Authority specifically recommends excluding virtual environments from version control.
Add this to .gitignore:
.venv/Should You Use .venv or venv?
Both names work, but .venv is often the better choice.
Reasons .venv is recommended:
- Mentioned in Python’s tutorial
- Hidden in many file explorers
- Avoids confusion with
.env - Recognized by many tools
If you are just starting out, .venv is a safe and modern default.
Quick Example: Start to Finish
Here’s the full basic workflow:
mkdir myproject
cd myproject
python -m venv .venv
.venv\Scripts\activate.bat
pip install requests
python --version
deactivate
This sequence:
- Creates a project
- Creates a virtual environment
- Activates it
- Installs a package
- Verifies Python
- Exits the environment
This matches the workflow described in official Python and PyPA guides.
Final Thoughts
Creating a virtual environment in Python is one of the simplest and most valuable habits you can develop early.
It keeps projects isolated, avoids dependency conflicts, and makes your development workflow cleaner and more professional—even as a beginner.
This is not an advanced trick. It is a basic foundation skill that will save you time, confusion, and frustration as you learn Python.
Once you get used to:
python -m venv .venvproject setup becomes faster, cleaner, and far less stressful.

